Juicy Pineapple Heaven Cake Recipe | Moist Tropical Dessert Everyone Loves
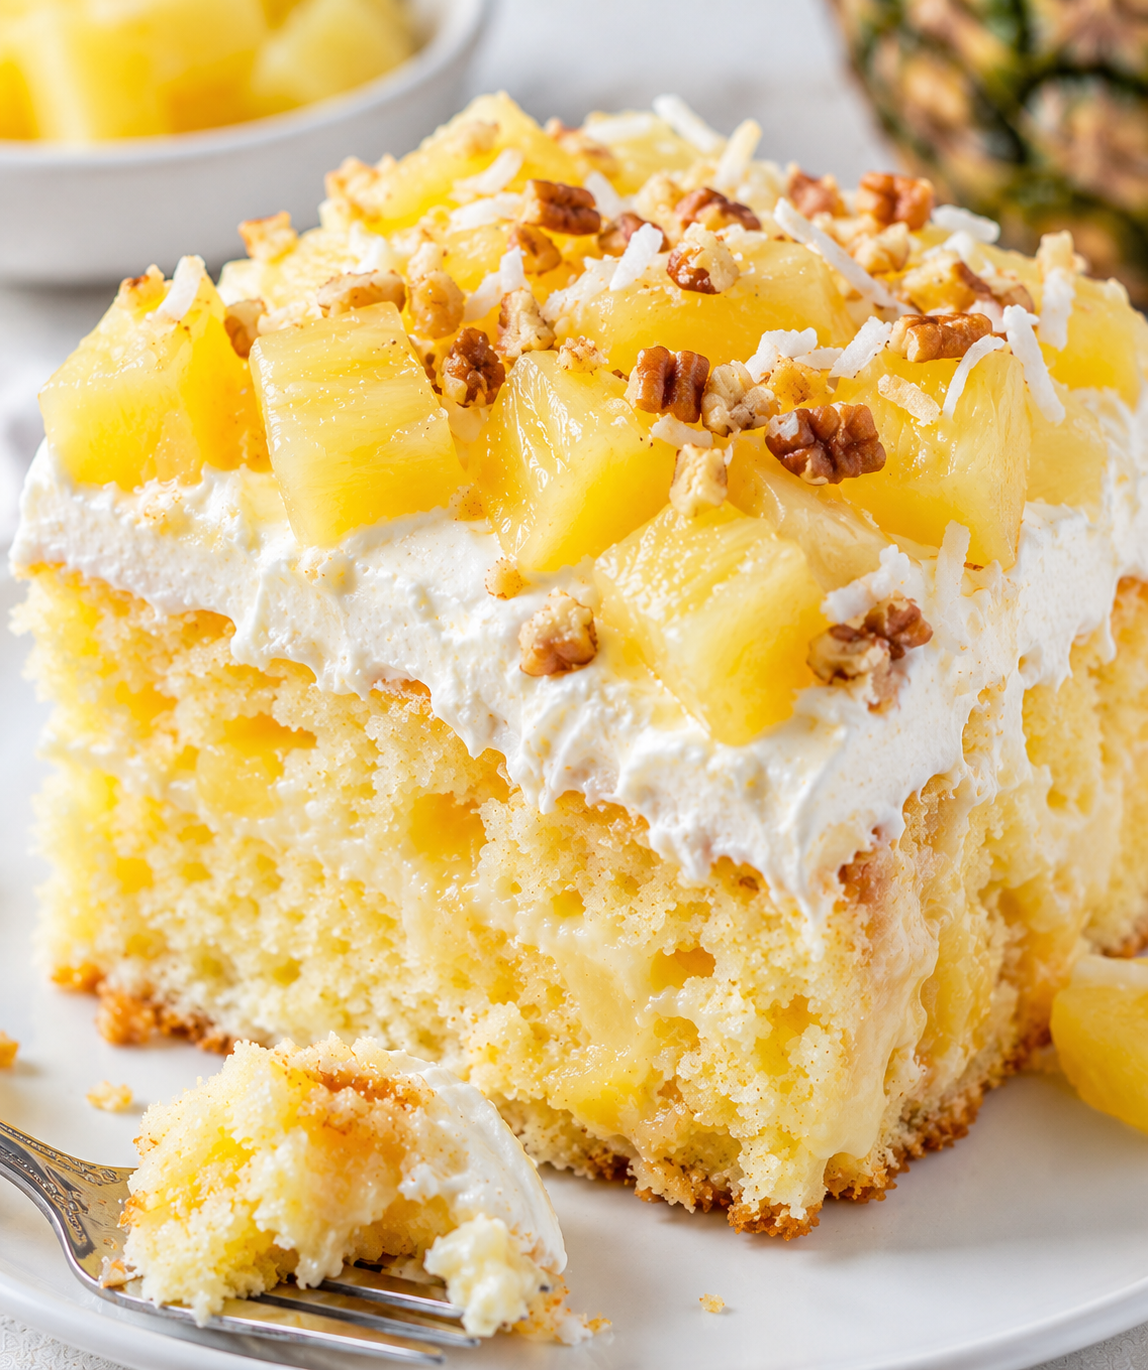
Juicy Pineapple Heaven Cake
Impossibly moist, bursting with real pineapple flavor at every layer — the tropical cake that disappears before dessert is even officially served.
This is not your average pineapple cake. The Juicy Pineapple Heaven Cake is a three-layer golden masterpiece soaked in fresh pineapple syrup, filled with a luscious pineapple curd, and finished with a cloud of stabilized whipped cream frosting. Every single bite is dripping with tropical flavor — hence the name.
Born from years of testing pineapple cake recipes that were always a little too dry, a little too bland, or a little too “pineapple upside-down cake adjacent,” this recipe was engineered for maximum juiciness. We’re talking pineapple in the batter, pineapple syrup soaked into every warm layer, and a homemade pineapple curd between each tier. The result? Pure, unapologetic, pineapple heaven.
🍍 The Triple-Pineapple Method: The secret to that extraordinary moistness is hitting the cake with pineapple at three stages — crushed pineapple folded into the batter for flavor, a pineapple simple syrup brushed on the warm layers to lock in moisture, and a bright pineapple curd as the filling. Each layer amplifies the last.
Why Everyone Loves This Recipe
We tested over a dozen versions of this cake before landing on the one you’re about to make. Here’s exactly why this moist pineapple cake earns a permanent spot in your rotation:
- ✦Outrageously moist — always — the pineapple syrup soak is the insurance policy every cake needs
- ✦Real pineapple flavor, not artificial — fresh or canned crushed pineapple does the heavy lifting throughout
- ✦The pineapple curd filling — tangy, silky, bright, and completely addictive between the layers
- ✦Stabilized whipped cream frosting — lighter than buttercream, holds its shape for hours, and lets the pineapple shine
- ✦Make-ahead perfection — actually gets better overnight as the flavors meld together
- ✦Showstopper presentation — crown it with fresh pineapple slices and it looks like it came from a patisserie
Ingredients
Bring all refrigerated ingredients to room temperature at least 1 hour before baking. This is especially important for the eggs and butter — cold ingredients won’t emulsify properly and you’ll lose the moisture and rise you’re chasing.
- 2½ cups (300g) all-purpose flour, spooned & leveled
- 2 tsp baking powder
- ½ tsp baking soda
- ½ tsp fine sea salt
- 1 tsp ground cinnamon
- ¾ cup (170g) unsalted butter, softened
- 1½ cups (300g) granulated sugar
- 4 large eggs, room temperature
- 2 tsp pure vanilla extract
- 1 cup (240ml) full-fat sour cream
- 1 cup (220g) well-drained crushed pineapple
- Zest of 1 large lemon
- PINEAPPLE SOAKING SYRUP
- ½ cup (120ml) reserved pineapple juice
- ¼ cup (50g) granulated sugar
- PINEAPPLE CURD FILLING
- 1 cup (240ml) fresh pineapple juice (from ~½ fresh pineapple)
- 3 large egg yolks
- ½ cup (100g) granulated sugar
- 3 tbsp cornstarch
- 3 tbsp unsalted butter, cold & cubed
- Pinch of fine sea salt
- WHIPPED CREAM FROSTING
- 3 cups (720ml) heavy whipping cream, cold
- ¼ cup (30g) powdered sugar, sifted
- 2 tsp pure vanilla extract
- 2 tbsp instant vanilla pudding mix (stabilizer)
- Fresh pineapple rings & mint for garnish
Crushed pineapple: Drain it thoroughly — press it through a fine-mesh sieve and save the juice for your soaking syrup. Excess moisture in the batter will collapse the crumb. Sour cream is non-negotiable here; it’s the fat that keeps every crumb tender and moist even days later. Full-fat Greek yogurt is the only acceptable swap. Fresh pineapple juice for the curd makes an enormous difference — it has natural enzymes and brightness that canned simply can’t match.
How to Make Juicy Pineapple Heaven Cake — Step by Step
Part 1: The Moist Pineapple Cake Layers
-
1Preheat & Prepare Pans. Preheat your oven to 350°F (175°C). Grease three 8-inch round cake pans generously, line the bottoms with parchment paper circles, grease the parchment, then dust lightly with flour. Tap out any excess. This prevents sticking without fail.
-
2Drain the Pineapple. Place your crushed pineapple in a fine-mesh sieve over a bowl and press firmly with a spoon. You’re aiming for well-drained fruit with as little moisture as possible. Reserve the juice — you’ll need ½ cup for the soaking syrup. Set both aside.
-
3Whisk the Dry Ingredients. In a large bowl, whisk together flour, baking powder, baking soda, salt, and cinnamon until evenly combined. Set aside. The cinnamon is subtle but adds a warmth that elevates the pineapple without competing with it.
-
4Cream Butter & Sugar. In a stand mixer fitted with the paddle attachment, beat the softened butter and sugar on medium-high for 4–5 full minutes until very pale, fluffy, and significantly increased in volume. Don’t shortcut this step — it’s how you build structure and lightness into the crumb. Scrape down the bowl halfway through.
-
5Add Eggs & Vanilla. With the mixer on medium, add eggs one at a time, beating well for 30 seconds after each addition. Add vanilla extract with the last egg. The mixture may look slightly curdled — that’s completely normal and will smooth out when you add the flour.
-
6Alternate Flour & Sour Cream. Reduce mixer to low. Add the flour mixture in three parts, alternating with the sour cream in two parts (flour → sour cream → flour → sour cream → flour). Mix only until just incorporated after each addition — a few streaks of flour are fine at this stage.
-
7Fold in Pineapple & Zest. Remove the bowl from the mixer. Using a large silicone spatula, gently fold in the well-drained crushed pineapple and lemon zest until just distributed throughout the batter. Don’t overmix — a gentle hand keeps the crumb tender.
-
8Bake. Divide the batter evenly among the three prepared pans (a kitchen scale makes this effortless). Smooth the tops. Bake for 30–35 minutes, rotating pans front-to-back at the halfway point. The cakes are done when the edges pull away slightly from the pan, the tops spring back when gently pressed, and a toothpick comes out with just a few moist crumbs.
-
9Soak While Warm — This Is the Moment. While the cakes bake, combine the reserved pineapple juice and sugar in a small saucepan over medium heat, stirring until the sugar fully dissolves. Remove from heat. As soon as cakes come out of the oven, immediately brush the syrup generously over each warm layer using a pastry brush. Let it soak in fully — this is what makes this cake unforgettably moist. Cool layers in pans for 15 minutes, then turn onto wire racks to cool completely (at least 1 hour).
Part 2: The Pineapple Curd Filling
-
1Whisk the base. In a medium saucepan (off the heat), whisk together the fresh pineapple juice, egg yolks, sugar, cornstarch, and salt until smooth and no lumps remain. This is easier to do cold before applying heat.
-
2Cook until thick. Place the saucepan over medium heat and cook, whisking constantly, for 6–8 minutes until the mixture thickens considerably and comes to a slow boil. Continue whisking at a gentle boil for 1 full minute — this cooks out the cornstarch taste completely.
-
3Finish with butter. Remove from heat. Add the cold cubed butter one piece at a time, whisking each piece in until fully melted and incorporated before adding the next. This emulsification gives the curd its silky, glossy texture. Pour into a bowl, press plastic wrap directly onto the surface to prevent a skin, and refrigerate until fully chilled and set — at least 2 hours, or up to 3 days ahead.
Part 3: The Stabilized Whipped Cream Frosting
-
1Chill everything. Place your stand mixer bowl and whisk attachment in the freezer for 10 minutes before whipping. Cold equipment whips cream faster and gives a more stable result.
-
2Whip to stiff peaks. Pour the cold heavy cream into the chilled bowl. Add powdered sugar, vanilla, and instant pudding mix. Begin whipping on medium, then increase to high. Whip until the cream holds firm, glossy peaks — about 3–4 minutes. Watch carefully; overwhipped cream turns grainy. The pudding mix stabilizes the frosting so it holds beautifully for up to 24 hours refrigerated.
Part 4: Assemble Your Pineapple Heaven
-
1Level the layers. If any cake layers domed during baking, use a long serrated knife to trim them flat. Even layers = a stable, beautiful cake.
-
2Build the layers. Place the first cake layer on your serving plate or cake board. Spread a generous layer of the chilled pineapple curd to the edges (about ½ cup). Add the second layer on top and repeat. Add the third layer.
-
3Apply a crumb coat. Using an offset spatula, spread a very thin layer of whipped cream frosting all over the cake — sides and top. This seals in any crumbs. Refrigerate for 20 minutes to set the coat before the final frosting.
-
4Frost & Garnish. Apply the remaining whipped cream frosting generously over the top and sides. For a rustic finish, use a spoon to create swooping peaks all over. Arrange fresh pineapple rings on top, a few mint leaves, and optionally a light dusting of fine toasted coconut. Refrigerate until serving — this cake is best served cold.
⏱ Timing Tip: This cake has several components that benefit from being made in stages. Day 1 — make the pineapple curd (refrigerate overnight). Day 2 — bake and soak the layers (cool completely). Day 2 evening — make frosting, assemble, refrigerate overnight. Day 3 — serve the most impressive pineapple cake anyone has ever tasted.
Expert Baker’s Tips
Drain your pineapple aggressively. Seriously. Press it hard. Wet pineapple in the batter will make it dense and gummy rather than moist and tender. The moisture you want comes from sour cream and the soaking syrup — not from undrained fruit.
Soak the layers while they’re HOT. Hot cake is porous and absorbs the syrup deeply into the crumb. Cold cake creates a wet surface that pools rather than penetrating. Don’t wait even five minutes — brush immediately.
The curd must be fully chilled. Warm or even room-temperature curd will melt your whipped cream frosting on contact and cause the layers to slide. Make it a full day ahead when possible.
Always serve this cake cold. The whipped cream frosting is stabilized but still cream-based. Pull it from the fridge no more than 30 minutes before serving for the best texture.
Delicious Variations
Add 1 tsp coconut extract to the batter and frosting. Press toasted coconut flakes all over the frosted cake. A piña colada in cake form.
Swirl 3 tbsp passion fruit pulp into the pineapple curd filling. The tart passion fruit makes the pineapple flavor sing even louder.
Fold ¾ cup chopped toasted macadamia nuts into the batter. Their buttery richness and crunch are a classic partner to tropical pineapple.
Nutrition (Per Slice)
Approximate values based on 14 slices. Calculated with standard full-fat ingredients.
Storage Guide
| Method | Duration | Notes |
|---|---|---|
| Counter | Not recommended | Whipped cream frosting requires refrigeration at all times |
| Refrigerator (assembled) | Up to 4 days | Cover loosely with a cake dome; serve within 30 min of pulling from fridge |
| Refrigerator (curd only) | Up to 5 days | Store with plastic wrap pressed directly on the surface |
| Freezer (unsoaked layers) | Up to 3 months | Wrap tightly in plastic + foil. Soak with syrup after thawing, while still slightly warm. |
| Freezer (assembled, unfrosted) | Up to 2 months | Freeze layers with curd, no frosting. Thaw overnight in fridge, then frost before serving. |
Frequently Asked Questions
Can I use fresh pineapple instead of canned in the cake batter?
You can, but with an important caveat: fresh pineapple contains bromelain, an enzyme that breaks down proteins — including gluten and the egg proteins that give your cake structure. For the batter, briefly simmer your fresh crushed pineapple for 5 minutes first to deactivate the enzyme, then drain and cool completely before folding in. For the curd, fresh juice is actually preferred and works perfectly since it gets cooked.
My cake layers sank in the middle. What went wrong?
This usually comes down to one of three culprits: the batter was overmixed after adding the flour (developing too much gluten), the pineapple wasn’t drained well enough (adding too much moisture), or the oven door was opened too early. Make sure your baking powder and soda are fresh (test by dropping a teaspoon into hot water — it should bubble vigorously) and resist opening the oven before the 25-minute mark.
Can I make this as a single-layer sheet cake instead?
Absolutely — and it’s a fantastic option for casual gatherings. Pour all the batter into a greased 9×13-inch pan and bake at 350°F for 40–45 minutes. Soak the whole cake with the syrup while warm, then frost with the whipped cream and spoon the pineapple curd over the top in a decorative drizzle. Serves 20 generously.
Can I substitute the whipped cream frosting with something more stable?
Yes! If you need a frosting that holds up in warmer conditions or doesn’t require refrigeration, swap for a pineapple cream cheese frosting: beat 8 oz softened cream cheese with ½ cup softened butter until fluffy, then add 3–4 cups sifted powdered sugar and 3 tbsp well-drained crushed pineapple. It’s richer but absolutely delicious and completely stable at room temperature for up to 2 hours.
Can I make this cake gluten-free?
Yes, with great results. Replace the all-purpose flour 1:1 with a quality gluten-free baking blend (we love King Arthur Measure for Measure or Bob’s Red Mill 1-to-1). Add ½ tsp xanthan gum if your blend doesn’t include it. The texture will be very slightly denser but the pineapple flavor and moisture come through beautifully.
How far in advance can I make the full assembled cake?
The fully assembled, frosted cake can be made up to 2 days ahead and refrigerated, covered. The whipped cream frosting (with pudding mix stabilizer) holds remarkably well. The pineapple curd can be made up to 5 days ahead. The unsoaked, unfrosted cake layers freeze for up to 3 months. This is genuinely one of the best make-ahead cakes in our collection.
More Tropical Recipes You’ll Love
📌 Loved this recipe? Save it, share it, and leave a ★★★★★ review below — it genuinely helps other bakers find this recipe and keeps our community going! Tag your creation on Instagram with #PineappleHeavenCake — we reshare our favorites every week.