Cherry Cheesecake Delight | Creamy No-Bake Cherry Dessert
Imagine a spoon sinking into a cloud of creamy vanilla, meeting a crisp crust, and then bursting through a jewel-toned cherry topping. This isn’t just a dessert; it’s a party for your taste buds, a moment of pure bliss, a true Cherry Cheesecake Delight | Creamy No-Bake Cherry Dessert. This no-bake wonder takes me back to summer potlucks, a hero dish that always vanishes first, leaving only happy smiles and sticky fingers. It’s the kind of effortless magic you can whip up for any occasion, promising sweet, tangy perfection every single time. This delightful dessert offers a myriad of reasons to fall in love:
- Effortlessly prepare this dreamy dessert with no oven required, making it perfect for busy days or warm weather.
- Savor a symphony of flavors, balancing rich, tangy cherries with a luxurious, velvety cream cheese filling.
- Present a visually stunning treat with vibrant red cherries glistening atop a pristine, creamy white base.
- Adapt this versatile recipe easily for different fruit toppings or crust variations, fitting any preference or event.
The Irresistible Allure of No-Bake Cheesecakes
Let’s be honest, sometimes the mere mention of baking a cheesecake sends shivers down the spine. The water baths, the cracks, the endless waiting for it to cool perfectly – it’s enough to make even the most seasoned home baker sweat. But what if I told you there’s a way to achieve that sublime, creamy texture and decadent flavor without ever turning on your oven? Enter the glorious realm of the no-bake cheesecake. It’s a game-changer, a dessert superhero, swooping in to save your party (and your sanity) with minimal fuss. This Cherry Cheesecake Delight | Creamy No-Bake Cherry Dessert is precisely that hero. My personal journey with no-bake desserts began during a particularly sweltering summer. The thought of adding more heat to my kitchen was simply unbearable, yet my sweet tooth was making demands. I stumbled upon a simple no-bake recipe, and honestly, it felt like cheating. Could something so easy truly taste good? The answer, as I soon discovered, was a resounding yes! The beauty of a no-bake creation lies in its simplicity and its ability to deliver intense flavor without the usual baking complexities. It frees you from the tyranny of temperature gauges and watchful waiting, allowing you more time to actually enjoy the fruits of your labor, or, in this case, the delightful cherries. Plus, it’s a fantastic way to impress guests with seemingly complex flavors that are, in reality, a breeze to assemble.
Why No-Bake is a Weeknight and Weekend Winner
Whether you are preparing for a spontaneous backyard barbecue or a quiet evening indulgence, a no-bake cheesecake fits every scenario. Its resilience makes it perfect for transporting to potlucks, and its make-ahead nature means you can prepare it hours, or even a day, in advance. Imagine the scene: guests are arriving, dinner is simmering, and your dessert is chilling serenely in the fridge, ready to be unveiled in all its glory. No last-minute oven scrambles, no frantic cooling. Just pure, unadulterated dessert zen. This specific creamy no-bake cherry dessert embraces all these qualities, making it a reliable favorite for any occasion that calls for something sweet and spectacular, yet utterly stress-free. The texture of a well-made no-bake cheesecake is also a marvel in itself. It’s often lighter and fluffier than its baked counterpart, thanks to the incorporation of whipped cream or heavy cream, giving it an ethereal quality that simply melts in your mouth. This lighter consistency makes it an ideal dessert for warmer months when heavy, rich foods might feel too much. It’s refreshing, cool, and perfectly satisfying without being overly dense. Every spoonful of this Cherry Cheesecake Delight promises a smooth, delightful experience, making it a standout treat.
Unveiling the Magic Behind Each Layer
Every magnificent creation has its foundational elements, and our Cherry Cheesecake Delight | Creamy No-Bake Cherry Dessert is no exception. This recipe masterfully combines three distinct layers, each playing a crucial role in delivering that unforgettable taste and texture. From the satisfying crunch of the crust to the velvety embrace of the filling and the vibrant burst of the topping, it’s a symphony of culinary craftsmanship, designed for pure enjoyment without any complicated steps. Let’s break down the individual components that make this dessert truly shine.
The Perfect Foundation: The Crumb Crust
A great cheesecake starts with an even better crust, and for a no-bake version, simplicity is key. We’re talking about a classic crumb crust – typically made from crushed cookies like graham crackers, combined with melted butter and a touch of sugar. The magic here is in the pressing. Really get in there and press that mixture firmly into your pie plate or springform pan. This isn’t just about creating a neat base; it’s about compacting those crumbs so they hold together beautifully once chilled. A well-pressed crust won’t crumble into a million pieces when you slice into your cheesecake, ensuring a clean cut and a delightful textural contrast with the creamy filling. The chilling time for the crust is also vital; it solidifies the butter, locking those crumbs into a sturdy foundation that can support the indulgent layers to come.
The Velvety Heart: Creamy Filling
Now for the star of the show: the creamy cheesecake filling. This is where the “delight” truly comes into play. Our filling combines softened cream cheese with confectioners’ sugar for sweetness and stability, a splash of vanilla powder for warmth, and whipped heavy cream for that unmistakable light, airy texture. The key to a truly smooth filling is ensuring your cream cheese is at room temperature. Cold cream cheese will result in lumps, and nobody wants a lumpy cheesecake. Whip the cream cheese until it’s light and fluffy before gently folding in the whipped cream. This gentle folding technique is essential to maintain the airiness, preventing the filling from becoming dense. The filling then relies on a good chill in the refrigerator to set up properly, transforming from a soft mixture into a firm, sliceable dream. This no-bake cherry dessert achieves its incredible richness from this perfectly crafted creamy layer.
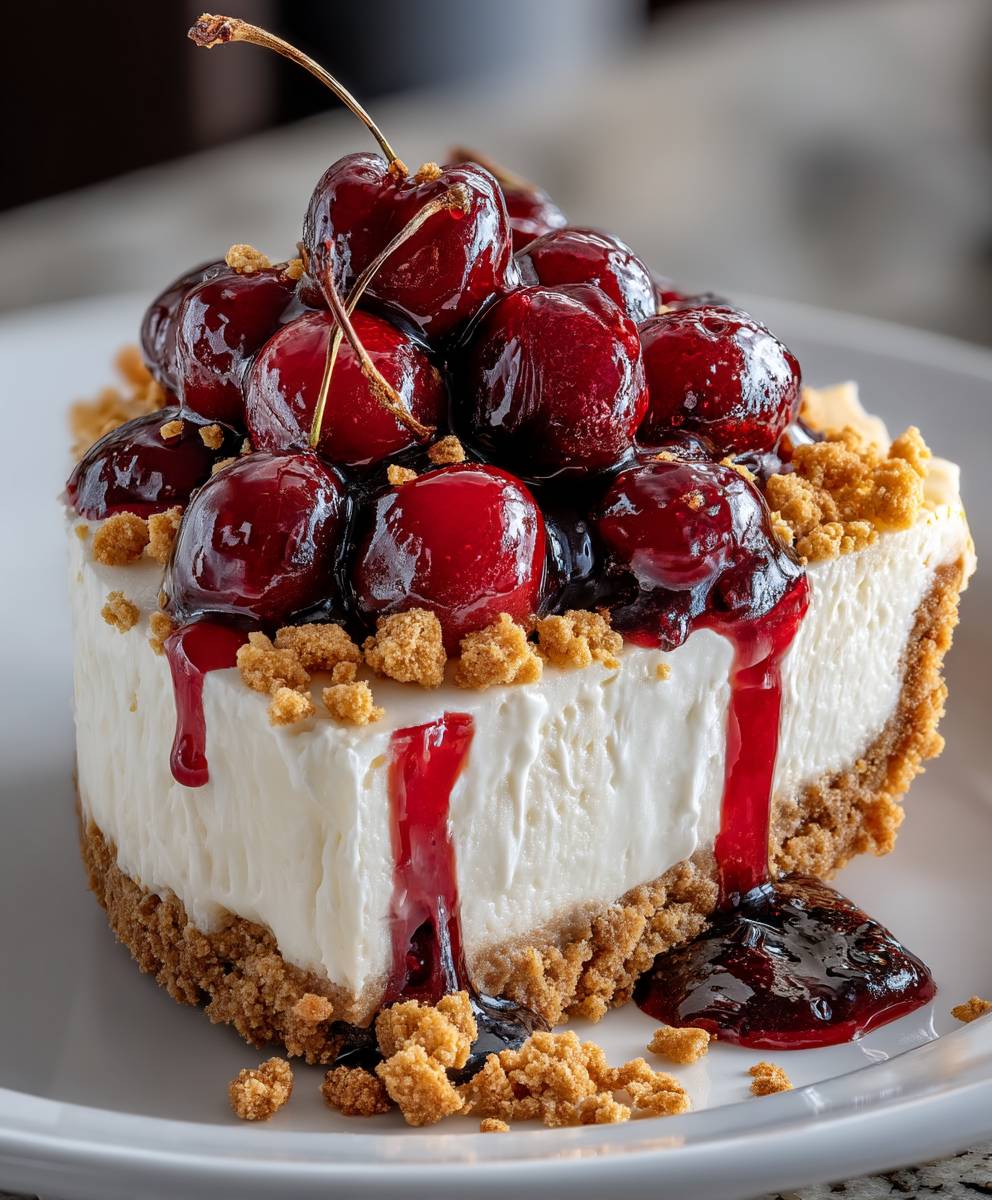
The Jewel Crown: Cherry Topping
What would a Cherry Cheesecake Delight be without its glorious cherry topping? This vibrant layer not only adds a burst of tangy-sweet flavor but also creates a stunning visual contrast against the pale, creamy filling. We’re using a classic canned cherry pie filling for ultimate convenience, but you can certainly make your own with fresh or frozen cherries, a little sugar, and a touch of cornstarch to thicken it. The brilliance of using pie filling is its ready-to-use nature – simply spoon it over your set cheesecake, and voilà! The glistening red cherries elevate the dessert from delicious to utterly show-stopping. The tartness of the cherries beautifully cuts through the richness of the cream cheese, creating a balanced flavor profile that keeps you coming back for more.
Ingredients for Cherry Cheesecake Delight | Creamy No-Bake Cherry Dessert
Here’s what you’ll need to make this delicious dish:
- Graham CrackersThese form the crunchy base of our cheesecake, providing a sweet and buttery foundation. Opt for classic honey graham crackers for the best flavor.
- Unsalted ButterEssential for binding the graham cracker crumbs together to create a firm, delicious crust. Melting it ensures easy mixing and even distribution.
- Granulated SugarA touch of sugar sweetens the crust just enough, complementing the creamy filling and tart topping. It helps to achieve a balanced sweetness.
- Cream CheeseThe star of our creamy filling, providing that signature tangy and rich flavor. Ensure it is fully softened to room temperature for a smooth, lump-free mixture.
- Confectioners’ SugarAlso known as powdered sugar, this fine sugar blends seamlessly into the filling, adding sweetness and contributing to its velvety texture without any grittiness.
- Vanilla PowderEnhances the overall flavor profile of the cheesecake filling, adding a warm, aromatic depth that pairs wonderfully with cherries. Use a good quality pure vanilla powder.
- Heavy CreamWhipped to stiff peaks, heavy cream is folded into the cream cheese mixture, making the filling incredibly light, airy, and luscious. It’s crucial for the no-bake setting.
- Canned Cherry Pie FillingThe convenient and vibrant topping for our delight. Choose a quality brand for plump, flavorful cherries in a perfectly thickened sauce.
The full ingredients list, including measurements, is provided in the recipe card directly below.
How to Make Cherry Cheesecake Delight | Creamy No-Bake Cherry Dessert
Follow these simple steps to prepare this delicious dish:
Step 1: Prepare the Graham Cracker Crust
Finely crush the graham crackers using a food processor or by placing them in a zip-top bag and crushing with a rolling pin. In a medium bowl, combine the crushed graham crackers, granulated sugar, and melted unsalted butter. Mix thoroughly until the crumbs are evenly moistened. Press the mixture firmly and evenly into the bottom of a 9-inch pie plate or a 9-inch springform pan. Use the back of a spoon or the bottom of a glass to really compact it. Place the crust in the refrigerator to chill for at least 15 minutes while you prepare the filling.
Step 2: Create the Cream Cheese Filling Base
In a large mixing bowl, using an electric mixer, beat the softened cream cheese on medium speed until smooth and creamy, about 2-3 minutes. Gradually add the confectioners’ sugar and vanilla powder, continuing to beat until fully incorporated and the mixture is light and fluffy. Scrape down the sides of the bowl as needed to ensure everything is well mixed.
Step 3: Whip the Heavy Cream
In a separate, chilled bowl, pour the cold heavy cream. Using an electric mixer (with clean beaters), beat the heavy cream on high speed until stiff peaks form. This usually takes 3-5 minutes, so watch carefully to avoid over-whipping. The cream should hold its shape when the beaters are lifted.
Step 4: Combine and Chill the Filling
Gently fold the whipped heavy cream into the cream cheese mixture using a spatula. Be careful not to deflate the air from the whipped cream; use slow, gentle motions until no streaks of white cream remain. Pour the creamy filling over the chilled graham cracker crust and spread it evenly with the back of the spatula or an offset knife. Return the cheesecake to the refrigerator and chill for at least 4 hours, or preferably overnight, until the filling is fully set.
Step 5: Add the Cherry Topping
Once the Cherry Cheesecake Delight is thoroughly chilled and the filling is firm, retrieve it from the refrigerator. Spoon the canned cherry pie filling evenly over the top of the cheesecake. Spread it gently to cover the entire surface, leaving a small border if desired. Return the cheesecake to the refrigerator for another 30 minutes to allow the topping to set slightly. Transfer to plates and drizzle with sauce for the perfect finishing touch.
Tips for Your Best Cherry Cheesecake Delight
Even with a no-bake recipe, a few clever tricks can elevate your Cherry Cheesecake Delight | Creamy No-Bake Cherry Dessert from good to absolutely glorious. These simple tips focus on common pitfalls and provide solutions to ensure your dessert is always a showstopper. From achieving the perfect creamy texture to ensuring your crust stays intact, these insights will help you master this delightful treat every single time you prepare it, leaving you feeling like a true kitchen wizard.
Mastering the Cream Cheese Softness
The secret to a truly smooth, lump-free cheesecake filling starts with your cream cheese. It must be at room temperature, and I mean *truly* room temperature. Take it out of the fridge at least an hour before you plan to start mixing, or even longer if your kitchen is cool. If you’re in a hurry, you can unwrap it and microwave it on low power for 10-15 seconds, checking frequently, but be careful not to melt it. A perfectly softened cream cheese blends seamlessly, creating a velvety texture that is crucial for a no-bake dessert. Lumps are the enemy of creamy indulgence, so give this step the attention it deserves!
Achieving Stiff Peaks with Heavy Cream
Whipping heavy cream might seem straightforward, but a few details make all the difference. Always start with very cold heavy cream and a chilled mixing bowl and beaters. You can place your bowl and beaters in the freezer for 10-15 minutes before whipping. Cold temperatures help the cream incorporate air more efficiently, leading to stable, stiff peaks. Watch the cream closely; it goes from perfectly whipped to slightly grainy (over-whipped) quite quickly. Stop when the peaks hold their shape firmly and don’t droop. Over-whipped cream can make your cheesecake dense, detracting from that lovely airy feel.
Patience is a Virtue: Chilling Time
This is arguably the most critical step for any no-bake cheesecake. The chilling time isn’t just a suggestion; it’s a non-negotiable requirement for the filling to properly set. For a perfect Cherry Cheesecake Delight, allow a minimum of 4 hours in the refrigerator, but overnight is truly ideal. This extended chill time allows the ingredients to fully meld and firm up, ensuring clean slices and a stable structure. Rushing this step will result in a soft, messy cheesecake that won’t hold its shape, no matter how perfectly you prepared the layers. Plan ahead, and your patience will be rewarded with an impeccable dessert.
Creative Topping Variations
While classic cherry pie filling is absolutely divine, don’t be afraid to experiment! This creamy no-bake cherry dessert is incredibly versatile. Consider a mixed berry compote for a different tangy twist, fresh sliced peaches in the summer, or even a drizzle of chocolate ganache for a richer experience. You could also swirl in some lemon zest into the cream cheese filling for a brighter note, or add a pinch of cinnamon to the graham cracker crust. The possibilities are endless, allowing you to tailor this delightful dessert to any season or preference, making it truly your own.
Why This Creamy No-Bake Cherry Dessert Deserves a Spot in Your Repertoire
In a world brimming with complex recipes and time-consuming culinary endeavors, the Cherry Cheesecake Delight | Creamy No-Bake Cherry Dessert stands out as a beacon of joy and simplicity. It’s the kind of recipe that empowers even novice cooks to create something truly spectacular, something that looks like it took hours of effort but, in reality, came together with charming ease. This delightful no-bake cherry dessert is more than just a sweet treat; it’s an invitation to relax, to enjoy the process of making food without the usual kitchen stress, and to savor every single, luscious bite. It’s a dessert that consistently delivers on its promise: a perfect harmony of textures and flavors. The satisfying crunch of the crust, the cloud-like creaminess of the filling, and the bright, fruity burst of the cherry topping create an experience that is both comforting and exhilarating. Whether you are hosting a grand gathering, a cozy family dinner, or simply treating yourself to a moment of pure bliss, this creamy no-bake cherry dessert is your go-to. It’s reliable, it’s delicious, and it always brings smiles to faces. Make this recipe once, and it will quickly become a cherished favorite in your recipe collection, ready to save the day (and your sweet tooth) whenever the craving strikes.
The Accidental Discovery of Sunshine on a Plate

My first attempt at a no-bake dessert was pure chaos, a kitchen disaster zone of crumbs and cream. Yet, from the rubble emerged this divine Cherry Cheesecake Delight, a creamy, sweet surprise that tasted like sunshine and laughter, proving even kitchen mishaps can yield culinary perfection.
Perfecting the Cooking Process
First, crush your cookies for the crust and press them firmly into the pan to chill. While the crust sets, prepare the creamy filling by whipping the cream and folding in the softened cream cheese. Finally, layer with the vibrant cherry topping for a seamless Creamy No-Bake Cherry Dessert experience that will delight everyone.
Add Your Touch
Swap vanilla wafers for graham crackers in the crust, or introduce lemon zest into the filling for a brighter note. A touch of alcohol-free almond extract in the cherry topping elevates the flavor beautifully, making this Cherry Cheesecake Delight uniquely yours and catering to individual tastes.
Storing & Reheating
Keep your Cherry Cheesecake Delight covered tightly in the refrigerator for up to 3-4 days to maintain its fresh taste and texture. Since it’s a delightful cold dessert, it doesn’t require reheating. Simply enjoy it chilled straight from the fridge for optimal creamy texture and refreshing flavor.
- Ensure your cream cheese is at room temperature for a lump-free, silky-smooth filling. This makes whipping it incredibly easy and prevents any unwanted curds in your creamy dessert.
- Chill the crust thoroughly before adding the filling; this prevents it from crumbling when slicing, giving you clean, beautiful portions every time. A well-chilled crust is the secret to success.
- For a vibrant cherry topping, use high-quality canned cherries in syrup. Drain them well, but reserve a little syrup to adjust consistency if you’re making your own compote.
My Aunt Mildred, usually a stern dessert critic, took one bite of this Creamy No-Bake Cherry Dessert and declared it “heavenly.” It was the ultimate compliment, making all the effort worthwhile and proving its universal appeal, even to the toughest judges.
Unveiling the Magic of This No-Bake Wonder
Ah, the allure of a dessert that demands no oven, no scorching temperatures, and no frantic checking for doneness! This Cherry Cheesecake Delight isn’t just a recipe; it’s a passport to pure, unadulterated bliss. It’s the culinary equivalent of finding a forgotten twenty-dollar bill in your old coat pocket – a delightful, unexpected joy. Imagine a dessert so effortlessly elegant, so incredibly delicious, that it makes you feel like a master chef, even if your usual kitchen exploits involve setting off the smoke detector. This particular creamy no-bake cherry dessert burst into my life during a sweltering summer, when the mere thought of turning on the oven felt like an act of self-torture. It quickly became my go-to for impromptu gatherings, lazy Sunday afternoons, and any moment craving a sweet escape.
Why You’ll Fall in Love with This Cherry Cheesecake Delight
If you’re wondering what makes this no-bake cherry cheesecake so utterly captivating, allow me to count the ways. This isn’t just a dessert; it’s a beacon of hope for busy bakers and a testament to the power of simple, yet incredible, ingredients.
- No Oven Required:Say goodbye to preheating woes and uneven baking. This Cherry Cheesecake Delight is a true no-bake hero, perfect for hot days or when your oven is already occupied.
- Speedy Preparation:While it needs chilling time, the active prep work for this creamy no-bake cherry dessert is surprisingly quick. You’ll be amazed how fast you can assemble this showstopper.
- Customizable Flavor Profile:From the crust to the topping, you have room to play. Adjust sweetness, add citrus zest, or experiment with different extracts to make it your own signature dessert.
- Crowd-Pleasing Taste:The combination of a crunchy crust, a smooth, tangy-sweet cream cheese filling, and a bright, fruity cherry topping is universally adored. It’s a guaranteed hit at any gathering.
The Anatomy of a Perfect Creamy No-Bake Cherry Dessert
Every masterpiece has its components, and this Cherry Cheesecake Delight is no exception. It’s a symphony of textures and flavors, carefully layered to create a harmonious whole. First, we have the foundation: a buttery, crumbly crust that provides a delightful textural contrast. This isn’t just a base; it’s the crunchy stage upon which our creamy drama unfolds. Next comes the heart of the dessert: a luscious, airy cream cheese filling. It’s smooth, it’s rich, and it hits all the right notes between sweet and subtly tangy. Finally, the crowning glory: a vibrant, glistening cherry topping. It’s the pop of color, the burst of fruity freshness that ties everything together, elevating a simple dessert into an extraordinary creamy no-bake cherry dessert experience. Each layer plays a crucial role, building up to that ultimate, satisfying spoonful.
Gather Your Arsenal: Ingredients for Your Delight
Before you embark on this delicious journey to Cherry Cheesecake Delight heaven, let’s ensure your kitchen is properly stocked. Think of these as your secret weapons, each playing a vital role in crafting the perfect creamy no-bake cherry dessert. Remember, quality ingredients make all the difference!
For the Irresistible Crust
Get ready for the crunchy foundation that holds all the magic together.
- 1 ½ cups graham cracker crumbs (roughly 10-12 full sheets, finely crushed)
- ¼ cup granulated sugar
- ½ cup melted unsalted butter or a plant-based butter alternative (for a dairy-free option)
For the Dreamy, Creamy Filling
This is where the “cheesecake” part of our Cherry Cheesecake Delight truly shines, a cloud of pure indulgence.
- 2 (8-ounce) blocks cream cheese, softened to room temperature (this is critical for smoothness!)
- 1 cup powdered sugar (also known as confectioners’ sugar)
- 1 teaspoon pure vanilla powder
- 1 ½ cups heavy cream, very cold (this whips up best!)
- Optional: 1 teaspoon lemon zest for a subtle, zesty kick that brightens the flavor profile beautifully.
For the Ruby Red Cherry Topping
The vibrant crown jewel of our creamy no-bake cherry dessert, adding a burst of fruity goodness.
- 1 (21-ounce) can cherry pie filling (be sure to check the ingredients to ensure it contains no animal-derived carrageenan; many brands use modified food starch or pectin). OR if you prefer to make your own:
- 2 cups fresh or frozen pitted cherries (thawed if frozen)
- ½ cup granulated sugar (adjust to your sweetness preference)
- 2 tablespoons cornstarch (for thickening)
- ¼ cup water or cherry juice
- Optional: ½ teaspoon alcohol-free almond extract (enhances the cherry flavor wonderfully)
Essential Equipment for Your Cherry Cheesecake Adventure
You don’t need a Michelin-star kitchen, but a few key tools will make your journey smooth and successful.
- 9-inch springform pan: Your best friend for easy removal and presentation.
- Mixing bowls: Have a few on hand for different components.
- Electric mixer: A handheld or stand mixer will save your arm muscles for the serious task of eating!
- Spatula and whisk: Indispensable for mixing and folding.
- Measuring cups and spoons: Precision is key in baking, even when it’s no-bake.
The Grand Performance: Crafting Your Cherry Cheesecake Delight
Now, for the main event! Follow these steps, and you’ll be on your way to a show-stopping Cherry Cheesecake Delight. Don’t worry, it’s easier than it sounds, and the results are utterly spectacular.
Step 1: Laying the Crunchy Foundation
This is where our creamy no-bake cherry dessert gets its sturdy, delicious base. In a medium bowl, combine the graham cracker crumbs and granulated sugar. Pour in the melted butter or plant-based butter alternative and mix thoroughly until the crumbs are evenly moistened and resemble wet sand. Press this mixture firmly and evenly into the bottom of your 9-inch springform pan. Use the bottom of a glass or your knuckles to really compact it. Once pressed, pop this into the refrigerator for at least 30 minutes. This crucial chilling time prevents a crumbly catastrophe later on.
Step 2: Whipping Up the Dreamy Filling
While your crust chills, let’s conjure the creamy magic. In a large mixing bowl, beat the softened cream cheese with your electric mixer until it’s light, fluffy, and completely smooth – no lumps allowed! Gradually add the powdered sugar, continuing to beat until well combined and airy. Stir in the vanilla powder and lemon zest, if using. In a separate, very cold bowl, whip the heavy cream until stiff peaks form. Gently fold the whipped cream into the cream cheese mixture until just combined. Be careful not to overmix; we want to keep that delightful airiness! Pour this velvety filling over your chilled crust and smooth the top with a spatula.
Step 3: Crown Your Creation with Cherries
It’s time for the vibrant finale! If you’re using canned cherry pie filling, simply spoon it evenly over the cream cheese layer. If you’re making your own topping: In a small saucepan, combine pitted cherries, granulated sugar, water (or cherry juice), and cornstarch. Bring to a simmer over medium heat, stirring constantly, until the mixture thickens and becomes glossy, about 5-7 minutes. Remove from heat, stir in alcohol-free almond extract if desired, and let it cool completely before spreading over the cheesecake. The cooler it is, the less it will disturb the creamy filling.
Step 4: The Patience Game (Chilling for Perfection)
This is arguably the hardest part: waiting! Once topped, cover your Cherry Cheesecake Delight loosely with plastic wrap and return it to the refrigerator. It needs a minimum of 4-6 hours to chill and set properly, but for the absolute best results, an overnight chill is ideal. This allows the filling to firm up perfectly, making for clean slices and a truly delightful texture. Trust me, it’s worth the wait for this ultimate creamy no-bake cherry dessert experience!
Serving Your Creamy No-Bake Cherry Dessert
Once thoroughly chilled, carefully remove the sides of the springform pan. A warm, dry knife helps create neat slices. For an extra touch of elegance, garnish each slice of your Cherry Cheesecake Delight with a dollop of fresh whipped cream, a few extra fresh cherries, or a sprig of mint. It’s perfect on its own, but these little embellishments truly elevate the presentation of your creamy no-bake cherry dessert. Serve immediately and watch the smiles erupt!
Troubleshooting Common Cheesecake Hiccups
Even the best chefs face challenges, but with this Creamy No-Bake Cherry Dessert, they’re easy to overcome!
- Soggy Crust Fix:Ensure your butter is well mixed with the crumbs and pressed firmly. Chilling the crust for at least 30 minutes before adding the filling creates a barrier against moisture.
- Lumpy Filling Solution:The cardinal rule is room temperature cream cheese! If it’s still lumpy, beat it longer before adding other ingredients. Sifting powdered sugar can also help.
- Runny Topping Tips:If using canned filling, ensure it’s well-chilled. For homemade, don’t skimp on cornstarch and allow the topping to cool completely before spreading.
Conclusion for Cherry Cheesecake Delight | Creamy No-Bake Cherry Dessert
The Cherry Cheesecake Delight is a true culinary gem, offering a perfect blend of creamy richness and tart cherry brightness without the need for an oven. This easy-to-follow, customizable recipe proves that kitchen creativity often leads to the most delicious and satisfying results. From its crumbly crust to its luscious filling and vibrant cherry topping, every layer contributes to an unforgettable experience. Whether you’re preparing it for a special occasion or simply as a delightful treat, this Creamy No-Bake Cherry Dessert will surely bring smiles and satisfied sighs. It’s a wonderful journey from potential kitchen chaos to a triumph of taste that everyone will adore.
Print
Cherry Cheesecake Delight | Creamy No-Bake Cherry Dessert
- Prep Time: 15 minutes
- Cook Time: 20 minutes
- Total Time: 35 minutes
- Yield: 4 servings 1x
- Method: Stovetop
- Cuisine: American
Description
Master this effortless Cherry Cheesecake Delight! A buttery graham crust cradles a velvety, no-bake cream cheese filling. Perfect for easy indulgence. Includes full instructions and nutrition facts.
Ingredients
- 1 ½ cups graham cracker crumbs (about 10–12 full graham crackers)
- ¼ cup (4 tablespoons) unsalted butter, melted
- 2 tablespoons granulated sugar
- 16 ounces (2 blocks) cream cheese, softened
- 1 cup powdered sugar
- 1 teaspoon alcohol-free vanilla extract
- 1 cup heavy cream, chilled
- 21 ounces (1 can) cherry pie filling
Instructions
- Step 1: Prepare the crust. In a medium bowl, combine graham cracker crumbs, melted butter, and granulated sugar until well mixed. Press the mixture firmly into the bottom of a 9-inch pie dish or springform pan. Place in the refrigerator to chill while you prepare the filling.
- Step 2: Make the cheesecake base. In a large bowl, beat the softened cream cheese with an electric mixer until smooth and creamy. Add the powdered sugar and vanilla powder, beating until fully incorporated and no lumps remain.
- Step 3: Whip the heavy cream. In a separate, clean bowl, whip the chilled heavy cream on high speed with an electric mixer until stiff peaks form.
- Step 4: Combine the filling. Gently fold the whipped cream into the cream cheese mixture until just combined and smooth. Do not overmix.
- Step 5: Assemble and chill. Pour the cheesecake filling over the chilled graham cracker crust and spread evenly with a spatula. Cover the dish loosely with plastic wrap and refrigerate for at least 4-6 hours, or preferably overnight, until firm.
- Step 6: Serve. Just before serving, spoon the cherry pie filling generously over the top of the chilled cheesecake. Slice and enjoy your creamy no-bake dessert.
Notes
- Keep any leftover slices tightly covered in the refrigerator for up to 3-4 days to maintain freshness and texture.
- This delightful dessert is designed to be served perfectly chilled, straight from the fridge, for the best refreshing taste and firm, creamy consistency.
- Elevate your serving by adding a swirl of extra whipped cream or a sprinkle of white chocolate shavings to each slice right before enjoying.
- For the silkiest filling, make sure your cream cheese is truly at room temperature before beating, and your heavy cream is very cold before whipping—these temperatures are key for a smooth, lump-free, and stable cheesecake.
Nutrition
- Serving Size: 1 slice (approx. 1/12th of a 9-inch dessert)
- Calories: 420
- Sodium: 280mg
- Fat: 28g
- Saturated Fat: 18g
- Trans Fat: 0g
- Protein: 38g